nbn Fibre to the Premises (FTTP) – BYO modem setup guide

Step 1: Locate the nbn NTD

Locate the nbn NTD in your home

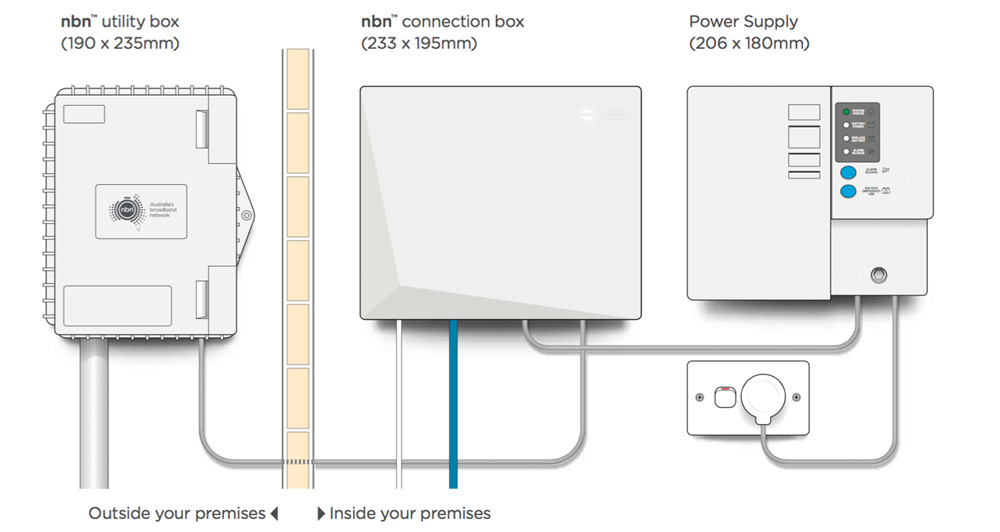
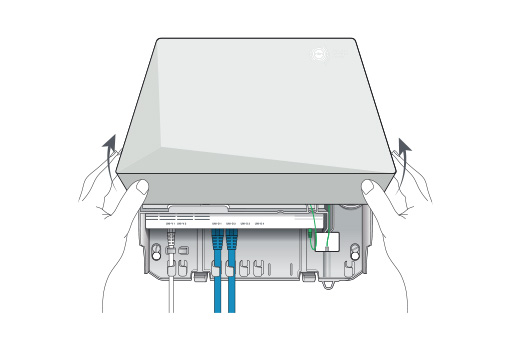
Find the indoor nbn FTTP Network Termination Device (NTD) in your home. This will usually be installed in a garage but may also be in less obvious places like a wardrobe, cupboard or under a staircase. Check your whole home to locate it.

nbn utility box

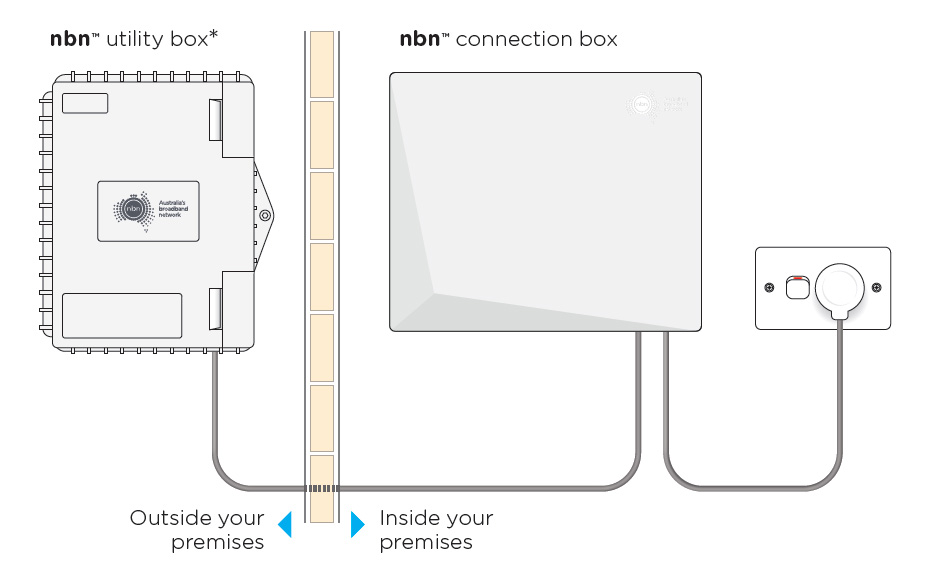
The NTD may be installed with or without a battery backup unit. The image below shows the NTD with a battery backup unit. Please note that battery backup adds limited value to an FTTP service — if your power is out, the NTD may run briefly on battery but your modem/router will not, so services like VoIP will stop working.

nbn connections home installation

Step 2: Plug in your modem/router

Plug your modem/router into the nbn NTD

Remove the cover on the NTD by pressing the clips on either side and lifting it at an angle.

modem cover

Ensure the NTD’s power cable is connected and switched on at the wall. After a few minutes, the POWER and OPTICAL lights on the NTD should be solid green. If the optical light is red or off, contact our support team.

power and modem lights

Connect your modem/router’s power cable and switch it on. Then, take an Ethernet cable (typically blue, yellow, grey or white) and plug one end into the active UNI-D port on the NTD (provided in your email/SMS). In many cases, this is UNI-D 1, but it could be UNI-D 2, 3, or 4.

nbn connections

Plug the other end of the Ethernet cable into the WAN port of your modem/router (sometimes labelled INTERNET, WAN/LAN or FIBRE). Do not use a telephone cable for this step.

💡 Tip: If you can’t get the lights to turn green or aren’t sure which UNI-D port is active, contact our support team.

Step 3: Configure your modem/router

Configure your modem/router

  1. Make sure your Ethernet cable is connected from the active UNI-D port on the NTD to the WAN port on your modem/router.
  2. Connect a computer, laptop, smartphone, or tablet to your modem/router using Wi-Fi or an Ethernet cable.
  3. Open a web browser and enter your modem/router’s default IP address (often 192.168.1.1, 192.168.20.1, 10.1.1.1 or 10.0.0.138). You can usually find this printed on the back or bottom of the device.
  4. Log in using the default username (usually admin) and password (usually admin or password). If these don’t work, check your modem’s manual, manufacturer’s website, or perform a factory reset.
  5. Locate the Internet Setup or WAN Setup section. If your modem has a Setup Wizard, follow it. When prompted for connection settings, enter:
    • Connection Type / Encapsulation: PPPoE (preferred) or IPoE/DHCP
    • Service Type / Access Type: Ethernet WAN
  6. If using PPPoE, enter the username and password from your MATE welcome email.
  7. Enable IPv6 if available, set to DHCPv6 or Auto Config (SLAAC).
  8. Save your settings and wait for your modem to connect. Lights should be green, blue or another ‘positive’ colour. Some lights may flash to indicate activity.
  9. Test your connection by visiting a website. If it works, you’re online.
💡 Tip: If you get stuck during setup or your modem won’t connect, contact our support team.