How to test your NBN internet using a direct connection
Home & Business Internet Blog | MATE | 18 September 2019
How to test your nbn connection directly
If you’re experiencing internet issues and you’ve already tried rebooting, a speed or nbn connection test (using a direct connection) is your next best option.
What does this mean, you ask?
Well, it’s where you connect an Ethernet cable from your device (like a laptop or PC) to your relevant nbn connection device, also known as a bridge connection. This way, you get the most accurate reading of your connection speed and stability, which can help you diagnose any potential network issues.
Why is an nbn direct connection test helpful?
By removing the need for Wi-Fi, you’re removing possible wireless interference and minimising the distance between your device and the router. This can paint a clearer picture of your network’s performance and help you troubleshoot problems.
For more details on nbn services, including whether full fibre service is available at your address yet, and whether you’re eligible to upgrade, visit the official nbn website.
How do I test my nbn connection?
To accurately check your internet speed and connection to the nbn, follow these steps:
Wherever possible, it is always best to perform a speed test via a direct connection to your relevant nbn™ connection device, also known as a bridge connection.
Performing an nbn™ speed test in this manner provides the most accurate reading of your connection speed and will help diagnose any potential network issues.
Step 1: Gather your equipment
What you’ll need:
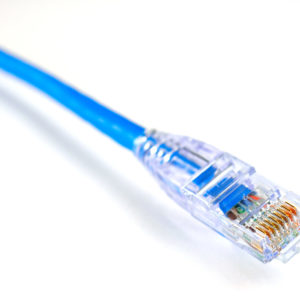
- An RJ-45 Ethernet cable (this is typically blue, yellow, grey or white)
- A USB to Ethernet adapter (if your computer doesn’t have an Ethernet port).
- Your nbn connection device (modem) — this will vary depending on what type of nbn service you have. If you’re not sure, you can find more information in our setup guides and FAQ pages.
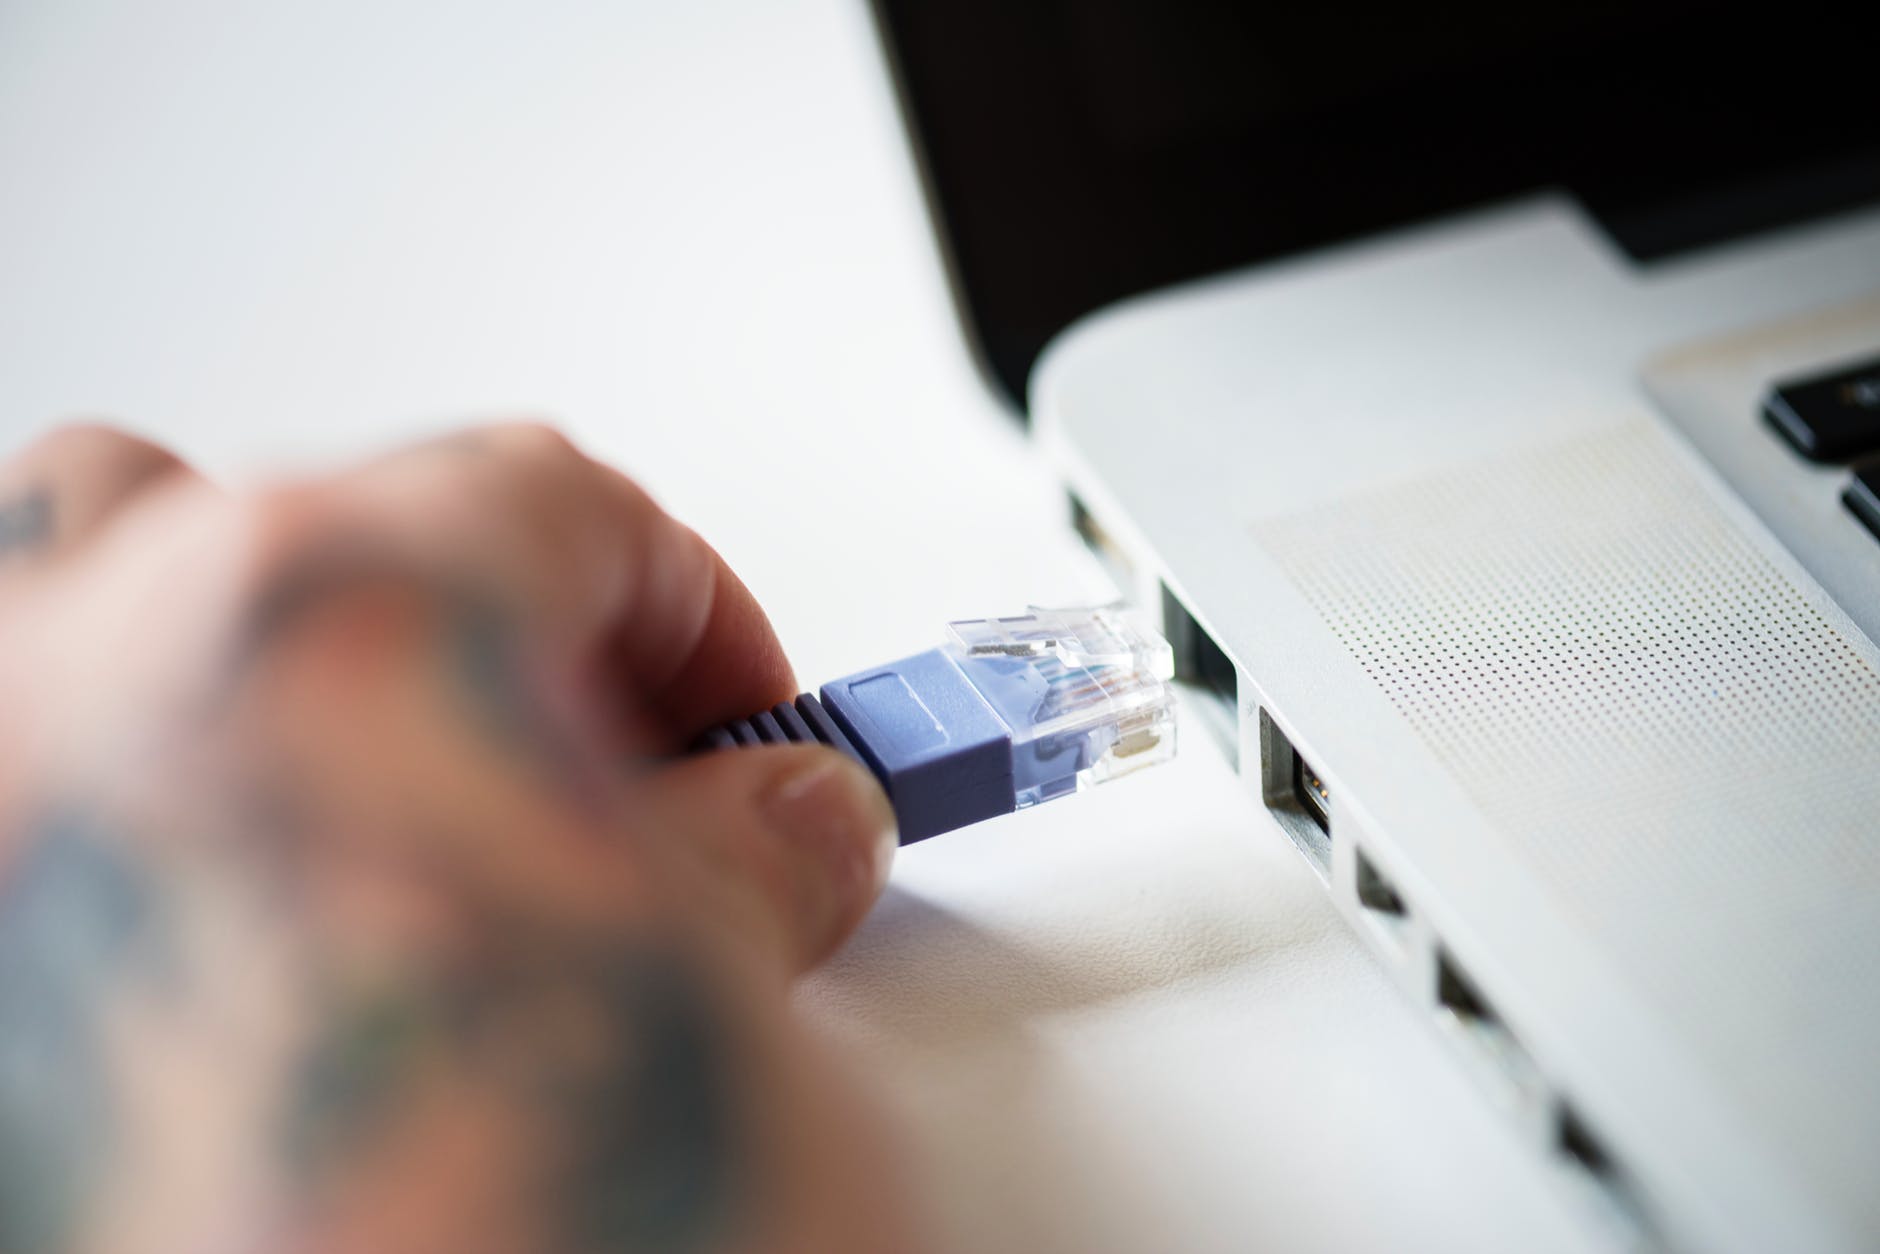
Step 2: Connect your computer directly to your nbn™ connection device
If your computer doesn’t have an Ethernet port, you may need a USB to Ethernet adapter to make the connection.
In most cases, the active port on your nbn connection device will be labelled UNI-D 1 or GATEWAY. If a different UNI-D port was activated when your nbn connection was set up, please use that one instead.
The nbn direct connection device will vary depending on what type of nbn service you have — if you’re not sure, you can find more information in our setup guides and FAQ pages.
An Ethernet cable is larger than a telephone cable, so be sure you’re using the right one. Fibre to the Premises (FTTP), Hybrid Fibre Coaxial (HFC) Fibre to the Curb (FTTC) and Fixed Wireless connections all connect using an Ethernet cable, so do not use a telephone cable with these connections.
Once you’ve connected your computer directly to your nbn™ connection device, follow the below instructions to set up a direct or bridge connection
Step 3: Configure the nbn connection test
Depending on your computer’s operating system, here’s how to get ready to perform the nbn connection test:
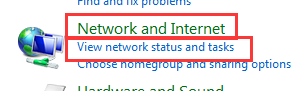
Configure with Microsoft Windows operating system
1. Navigate to “Control Panel”, then click on “Network and Internet”
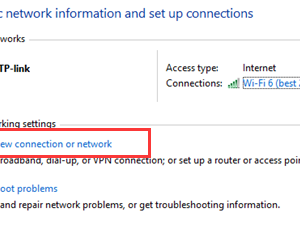
2. Click on “Network and Sharing Centre”
3. Click on “Setup a new connection or network”
4. Click on “Connect to the Internet”
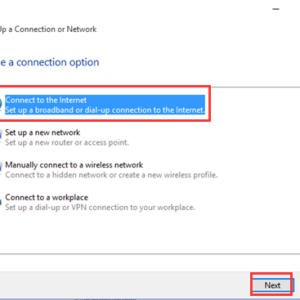
5. Click “set up a new connection anyway”
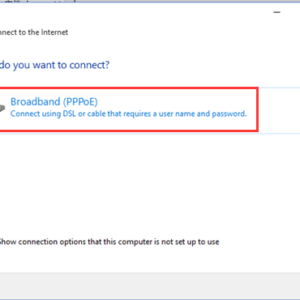
6. Choose “Broadband (PPPoE)”
7. In the “Username” field, enter your supplied MATE connection username. This will be in the following format – [email protected]
Note: Your MATE service username would have been emailed to you when you transferred your service.
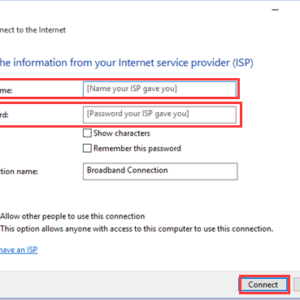
8. In the “Password” field, enter your supplied MATE connection password.
Note: Your MATE service password would have been emailed to you during the order process. This is NOT the same password as your MATE self-care login.
9. If you’re unsure of your MATE connection username and/or password, contact our support team to obtain these details
Configure with Apple macOS operating system
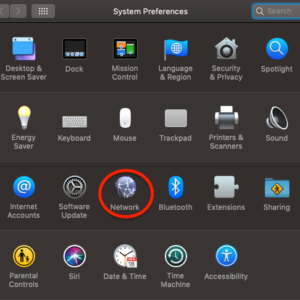
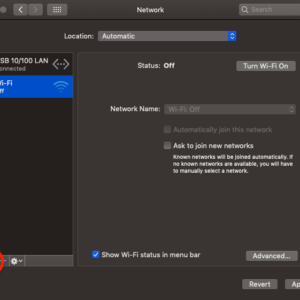
1. On your Mac, choose Apple menu, then navigate to System Preferences and click on “Network”.
2. Click on the Add (+) button near the bottom right corner to add a new connection.
3. In the dropdown list for “Interface”, select PPPoE.
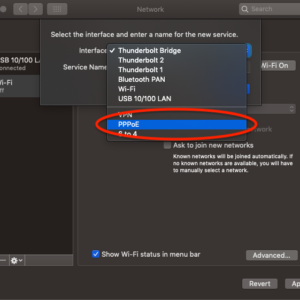
4. In the dropdown list for “Ethernet” select Ethernet or USB 10/100 LAN if you are using an adapter. Click “Create”.
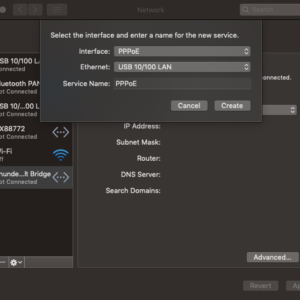
5. Leave the “PPPoE Service Name” field blank.
6. In the “Account Name” field, enter your supplied MATE connection username. This will be in the following format – [email protected]
Note: Your MATE service username would have been emailed to you during the order process.
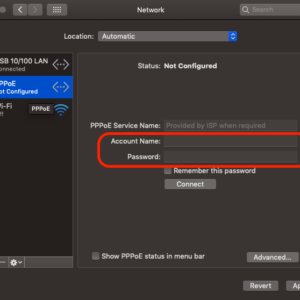
7. In the “Password” field, enter your supplied MATE service connection password.
Your MATE service connection password would have been emailed to you during the order process. This is NOT the same password as your MATE self-care login.
8. If you’re unsure of your MATE connection username and/or password, contact our support team to obtain these details.
9. Click “Apply”
Step 4: Run the speed or connectivity test
Now that your computer has an nbn direct connection, it’s time to test its speed or connectivity using your Ethernet cable. Start the process by opening your browser and choose either the Speed Test or Network Stability Test depending on whether speed or Wi-Fi dropouts are your issue.
Step 5: Interpreting your results
Once your test is complete, it’s time to compare the results to your nbn internet plan. Your internet service provider (ISP) will offer varying speeds for different nbn plans — keep in mind that there is a difference between the download and upload speeds, which can both differ during peak times as well.
If the results are slower than you were hoping for, you can check out our troubleshooting guide or reach out to our friendly, Australia-based customer support team for more help.
Ready for an upgrade?
At MATE, we pride ourselves on providing you with top-tier nbn plans that ensure your connectivity is as fast and stable as you need it to be. If you’re ready to go faster or kick things up a notch, it might be time to upgrade to our You Beaut, Fair Dinkum or No Worries nbn plans.
There’s a MATE internet plan for every household, budget, and internet speed requirement, so take a look and find the right plan for you. And if you’re still not sure, give our Aussie customer service reps a buzz — they’re there to help you get online faster!