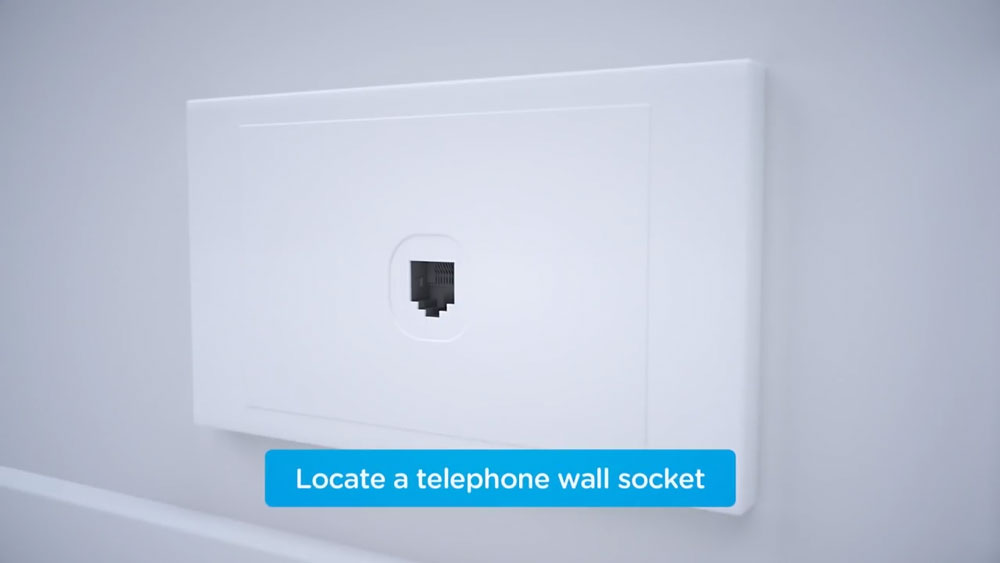
HOT OFFER! Save $20 per month for 5 months on selected nbn internet plans!...Use promo code SAVE20 at checkout!

ADSL – BYO Modem

step 1

locate the telephone wall socket in your home

Find the telephone wall socket in your home. They’re most commonly found in the main living room space or bedrooms, but can sometimes be in the kitchen area. It should look something like the photo below. Make a note of all the sockets in your home, even ones that may be in non-ideal locations such as bedrooms.

Locate A Telephone Wall Socket

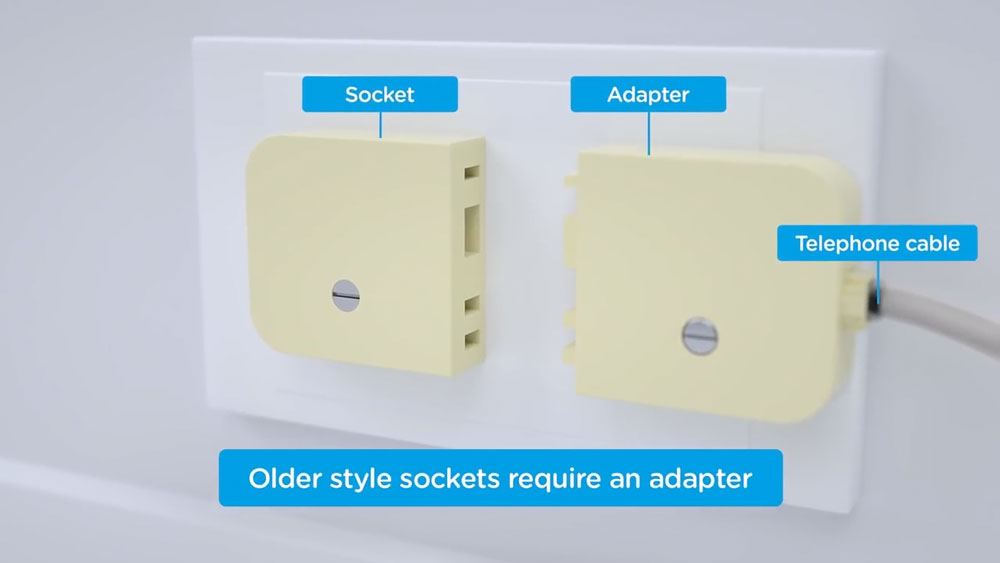
If your home has an older style wall socket shown below (typically the plug is a yellow square with 3 prongs), you’ll need to purchase a Jackson adapter that allows you to plug in a modern RJ11 phone cable. These adapters can be purchased at most electronics and computer stores.

Older Style Telephone Socket

step 2

plug in your ADSL modem to the telephone wall socket

Disconnect all devices in your home such as telephones, modems, fax machines or anything else that is plugged into a telephone wall socket. It is very important that you have no other devices plugged into sockets in your home for the initial setup. After setup, any devices plugged into a telephone wall socket will need to use an adsl filter/splitter.

Take your modem’s power supply cable and use it to connect your modem’s power port to an electrical outlet. Switch the powerpoint on.

Plug the included grey telephone cable that comes with your adsl modem into the DSL/ADSL port on the back of your adsl modem. Plug the other end of the telephone cable into your wall socket.

The setup should look like the below image once completed if you are not using an adsl splitter/filter:

Adsl Modem Installation

The setup should look like the below image once completed if you are using an adsl splitter/filter:

Adsl Filter Wall Socket

You will now need to wait for the DSL light on your modem to turn solid – this may take up to 15 minutes. DO NOT UNPLUG THE DEVICE DURING THIS TIME.

If the DSL light on your adsl modem does not turn solid after 15 minutes and you have more than one socket in the home, please plug your adsl modem into other sockets in your home, and turn the power on and off once plugged in. Leave your adsl modem plugged into each socket for up to 15 minutes until the DSL light on the modem turns solid.

Netcomm Nf18acv Front

step 3

connect and configure your BYO modem

Your BYO modem will need to be configured with your new MATE adsl details to work. You require an ADSL modem to use this service.

1. First, ensure the supplied telephone cable with your modem (this is usually grey or white) is plugged from the DSL/ADSL port on the back of your BYO modem, into the telephone wall socket in your premises. Ensure the power cable is plugged into a power outlet and switched on.

2. You will now need to connect your BYO modem to your device. You’ll need a computer, laptop, tablet or smartphone that is connected to your BYO modem via Ethernet or Wi-Fi.

3. Once you have connected your device to your BYO modem, open the web browser on your connected device and type in your modem’s default gateway/admin IP address in the address bar. This will be printed on the bottom or back of your modem depending on the make and model. Some of the most common addresses are 192.168.1.1, 192.168.20.1, 10.1.1.1 and 10.0.0.138. The IP gateway address for your modem will typically be printed on the bottom or back of your device.

4. Once you have accessed the gateway of your modem, you may see a login page. If there’s a username or login field, the default username will almost always be admin (it may even already be filled in). The default password is typically admin or password.

If you can’t log in with these settings, please check the manufacturer’s website for your BYO modem default login settings. If your BYO modem is secondhand or you have used it previously, it may have custom login details set. If you need to, you can factory reset the modem to return it to the default settings.

5. From here, it gets a little tricky to offer general advice for all BYO modems. The layout of modem settings pages can vary greatly for each different device depending on the make and model. If you get stuck or it is not clear where you should change your internet settings, you need to check the manufacturer’s website for support information. Ideally, your modem will have a Setup Wizard or Quick Setup section that will run automatically the first time you log in to the settings, or there’ll be a fairly obvious button to launch it.

6. The Setup Wizard or Internet Settings section should run you through entering the required connection settings, step by step. The most important settings are the following:

Encapsulation or Connection Type – MUST BE SET TO PPPOE

Connection Mode/Access Type/Service Type – MUST BE SET TO ADSL

VPI/VCI Settings – VPI 8 VCI 35

This will then allow you to enter your username (sometimes called Login) and password which are supplied in your MATE welcome email, titled “You’re nearly there mate!”

7. After completing the Setup Wizard or Internet Settings section and saving your settings, give the modem some time. Some modems reboot automatically after every new configuration, while others simply need a few minutes to apply the settings.

Take a look at the lights on your modem. Most should now be green, blue, purple or another “positive” colour. Many modems have lights that flash to indicate connection activity, so you shouldn’t be concerned if any lights are flashing unless the manufacturer’s support information specifically advises that flashing lights indicate a problem.

8. Hop on one of your computers or Wi-Fi devices and try to visit a website. If it works, your MATE nbn™ internet is up and running! If you have issues connecting, please contact our support team for further troubleshooting.